# Using the Reporting Server
# Introduction: This is how it works
The Reporting Server generates a report in three steps:
- it selects the targets from a loop-statement (recipient, analysis month, ...)
- it gets the data and generates the content for each target
- it creates the target document(s) and stores them / sends them via e-mail
Accordingly, you need to create a report like this in the Admin area:
- define a report
- define report chapters
- create and store the template files for the display
After creating a report, it is activated and working like this:
- The report is triggered (manually via your frontend or via Cronjob).
- The loop-statement is executed, and the data target (per user, per day ...) is determined. Now for each data record the following steps are executed:
- The statements of all report chapters are executed, and the data of each report chapter is determined. This data can then be used in the e-mail and document templates. For the structure of a report, see here.
- The target documents per chapter are generated (if configured). Target documents are generated either based on templates in the defined target format or, without a template, as an Excel file.
- All generated documents are stored in the report history (if archiving is activated).
- An e-mail is generated from a defined template and sent with the generated documents as attachment (if e-mail is set).
Note: The Reporting Serves gets its data not from the 4ALLPORTAL, but directly from the SQL-database.
# Creating a report
# 1. Define a report
Let's get started! To define a report and its targets, open the module Reports (section General) and click "Create" in the upper right corner to create a new report.
Fill in all fields to customize your new report. Save your choice in your toolbox in the upper right corner.

- Enable: Set "enable" to activate a time-controlled triggering using Cron.
- Owner: Choose an alternative owner of the report (optional).
- Report-type: Define which kind of document will be created (e-mail or file).
- Archive-name: If more than one document will be created within a report, you can specify the name of the zip-archive here. Variables can be used. They will be converted by the template engine.
- Archive owner: Choose an alternative owner of reports in report history (found in
Created Reports). - Testmode activated: If set, e-mails will be sent to the report creator instead of the addresses of the report. Also, reports will not be saved in
Created Reports. - Mailreceiver for test: E-mails will be sent to this address instead of the report creator's (only if "Report-type" is set to "e-mail").
# Field Report-template
Fill in the name of the template you want to use (without adding .4aptpl). This field depends on your chosen Report-type:
- E-Mail: The template you specified in
Report-templateis used to create an e-mail. The type should be HTML or text. If no template is specified, a default is used for testing purposes. You can find it here:- report/templates/default_mail.4aptpl
- report/templates/resources/default_mail.html
- File: The template you specified in
Report-templateis used to create a file. It is possible to store DOCX- or HTML-files in addition to Excel. If no template is specified here, an Excel-sheet will be created.
# Field Cron
If you want to get your reports at a specific time or repeat them regularly, fill in this field. The syntax is like the syntax of the cron-utility in linux/unix. Remember to put a space between the characters.
   ┌───────────── minute (0 - 59)
   │ ┌───────────── hour (0 - 23)
   │ │ ┌───────────── day of the month (1 - 31)
   │ │ │ ┌───────────── month (1 - 12)
   │ │ │ │ ┌───────────── day of the week (0 - 6) (Sunday to Saturday;
   │ │ │ │ │                                   7 is also Sunday on some systems)
   │ │ │ │ │
   │ │ │ │ │
   * * * * *
Example for execution of the report every day at 3 AM: 0 3 * * *.
After saving your report later, a click to tab "Details" of a report will give you further information about your configured Cron-time:
- Next execution: The next exec-time is shown (readonly).
- Last execution: The last exec-time is shown (readonly).
- Exec-status: The status of the last execution. If successful:
EXEC_STATUS_OK(readonly).
Note: The execution is based on UTC time.
# Field Loop-statement (SQL)
In this field you can determine the target(s) of you report (e.g. the users of your 4ALLPORTAL) by configuring an SQL query. This query creates a list of targets. For each data record that results from this loop-statement, a report will be created. The determined contents can be used to configure single chapters (see below).
Configuring a loop-statement is optional. If no loop-statement is configured, only a single report will be created.
If you want to send your report via e-mail, change the language or customize the way of filing, you need to defined this within this loop-statement. For all details, take a look at the chapter All about loop-statements.
Example:
Suppose you want each user of the DAM to regularly receive an e-mail with a list of "their" assets. Then this is what you need to configure in your report's loop-SQL-statement to select all users:
SELECT id AS target, id AS __to_user, email, firstname, lastname FROM user WHERE deleted = 0
# 2. Define report chapters
In report chapters you can select the desired content of your reports, e.g. the assets you want to be informed about.
After you have saved your report, an overview of it has opened. If you have closed the module, just reopen it, and a list of all created reports will show. Just click the one you want to work with. Click the tab "Details" and then "Create" in the lower left corner. A pop-up-window will open:
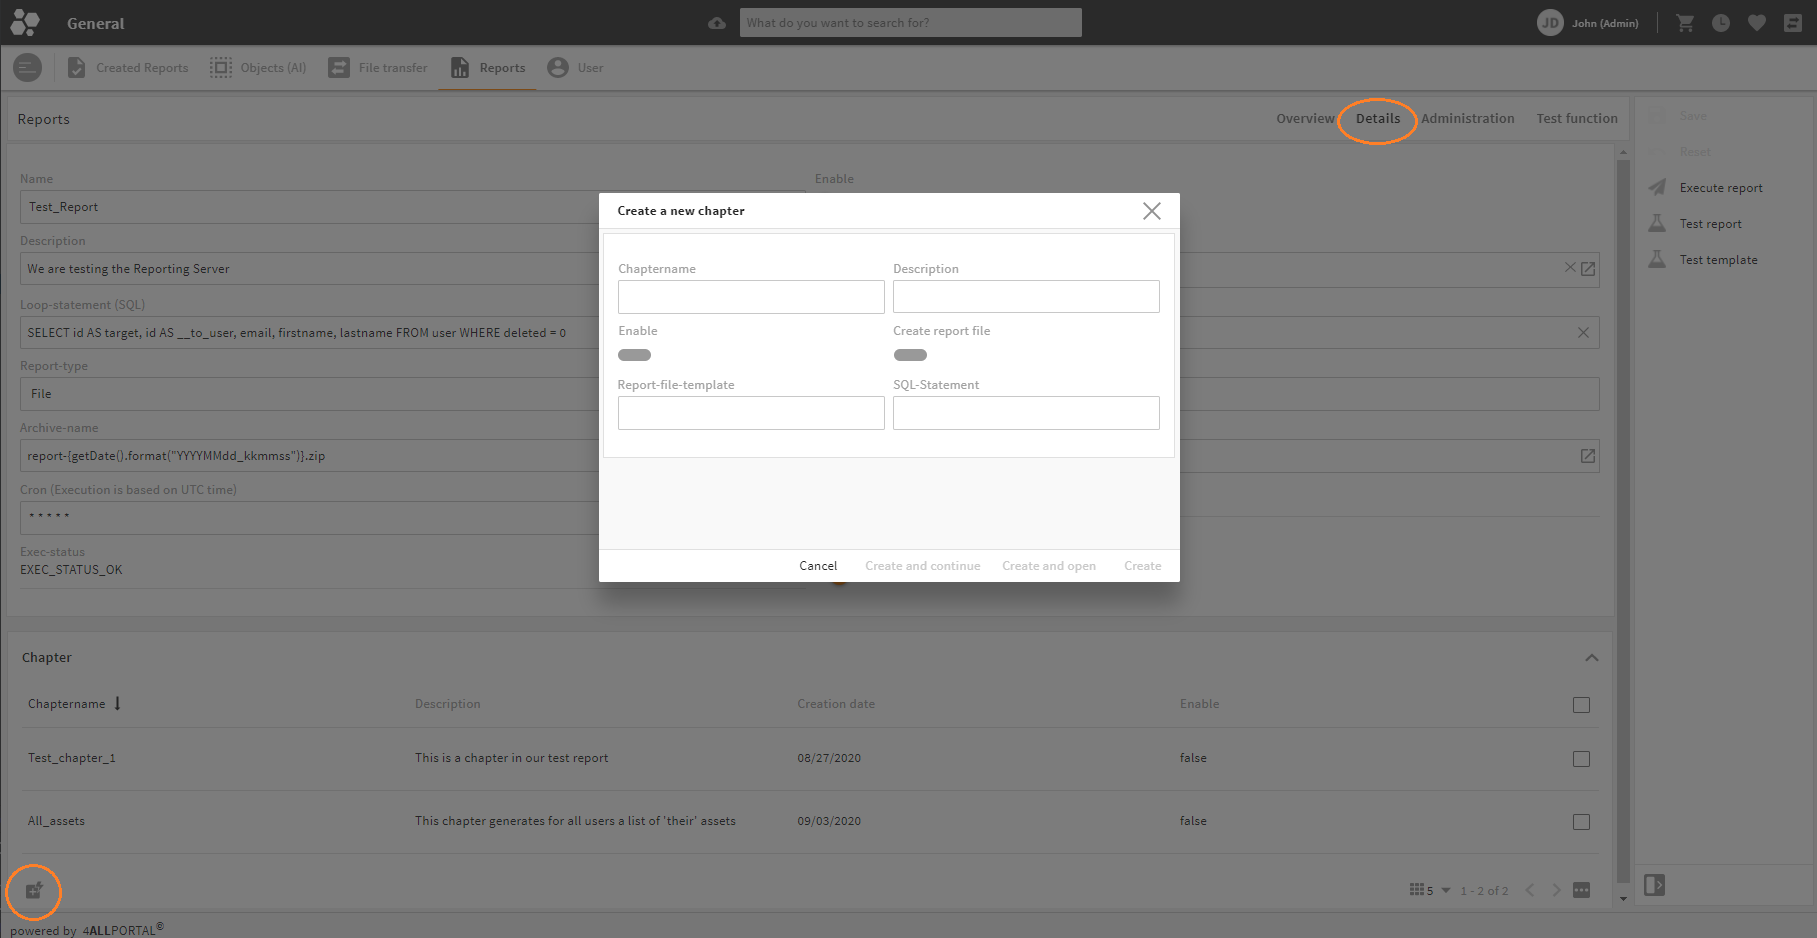
- Chaptername: Give your chapter a name. This name is used to address the generated content in the report templates. If Excel documents are generated, this name corresponds to an Excel sheet. Otherwise, the data per chapter is stored under this name.
- Description: Give a description.
- Enable: If not enabled, this chapter will be ignored when the report is generated.
- Create report file: If enabled, the generated data of this chapter is used to generate a separate report file.
- Report-file-template: Fill in the name of the template you want to use (without adding
.4aptpl).
Note: A report chapter always collects data, even if you disable generating a document. The data is still determined and can be used, e.g. when creating a document for another chapter. You could create an Excel file with two sheets (one per chapter-data) for example.
# Field SQL-Statement
In this field you can determine the content data of you report (e.g. all downloaded assets in a certain time) by configuring an SQL query. Variables can be used. They will be converted by the template engine. Mainly the respective results of the loop-SQL-statement are used here.
Example: Remember our example above? Now this is what you need to configure in your chapter's SQL-statement to define the assets about which your users should be informed:
SELECT
    name, parent_path
FROM
    file
WHERE
    owner_user = {sqlv source=target}
        AND deleted = 0
In this example the string {sqlv source=target} is replaced by the corresponding user ids.
After defining the report's and chapter's SQL-statements like shown above, the corresponding data structure looks like this.
# 3. Store template files
Finally, if you want to use templates to display your data (e.g. in a predefined Excel-sheet), you need to create and store them here: /custom/modules/report/templates.
Place your 4aptpl files right here, and the corresponding template files in the subfolder resources.
Remember to use the file names without .4aptpl in the frontend.
For testing and error handling purposes you will find some predefined templates are already here:
- report/templates/default_protocol_mail.4aptpl
- report/templates/default_error_mail.4aptpl
- report/templates/default_mail.4aptpl
- report/templates/resources/default_error_mail.html
- report/templates/resources/default_protocol_mail.html
- report/templates/resources/default_mail.html
The configuration and activation of templates is described in the documentation of the template engine (opens new window).
# All about loop-statements
When creating a report, you can configure a loop-statement (SQL) in order to define the target(s) of you report (e.g. the users of your 4ALLPORTAL). For each data record that results from this loop-statement, a report will be created. Using SQL-statements gives you a lot of possibilities to define.
# Identifiers for general information
| name | description |
|---|---|
| external_url | shows installation URL (readonly) |
| __exec_start_time | shows execution start of a report |
| report_data_json | shows related data of a report |
| chapter_names | shows all chapters of a report |
# Identifiers for e-mail
If you want to send your report via e-mail, the receivers must be defined within the loop-statement. Various identifiers are available for this purpose:
| identifier | example | description |
|---|---|---|
| __to_user | created_by AS __to_user | user-id or list of receivers (comma-separated) |
| __cc_user | user-id using cc (copy) | |
| __bcc_user | user-id using bcc (blind copy) | |
| __to_contact | select id as __to_contact from contact where deleted = 0 | contact-id or list of receivers |
| __cc_contact | ||
| __bcc_contact | ||
| __to_email | select 'target@example.com' as __to_email | e-mail adress or list of receivers (comma-separated) |
| __cc_email | ||
| __bcc_email | ||
| __to_rolename | select 'Admin, User' as __to_rolename | name of role or list of roles (comma-separated) |
| __cc_rolename | ||
| __bcc_rolename |
# Identifier for language
You can also define the language used in your reports. The following identifier allows switching between different language versions in the e-mail or document templates:
| identifier | example |
|---|---|
| __target_lang | en_US |
# Identifiers for storing reports
If you activated "history" for your report in your role configurations, all created files are available in the module Created Reports until an expiration date. The default is 60 days. If you want to define a different expiration date for a report, just use the variable __avail_until in your loop-statement:
| identifier | example |
|---|---|
| __avail_until | SELECT DATE_ADD(NOW(),INTERVAL 180 DAY) AS __avail_until |
A report can also be stored in your file system. The following identifiers are available for this:
| identifier | example | description |
|---|---|---|
| __copy_to_path | select '/usr/local/mam/data/reports/' as copy_to_path | Defines an absolute path to where the this report is copied. Existing files with the same name will be overwritten. |
| __copy_to_folder_id | SELECT '0a9a0478-5ed0-4a3f-aabd-937ec0bdf091' AS __copy_to_folder_id | Defines the id of a folder in your DAM to which this report is copied. Existing files with the same name will be overwritten. |
| __source_id | select id as __source_id, 'user' as __fieldrelation_module, 'reports' as __fieldrelation_name from user... | In connection with _fieldrelation_module and _fieldrelation_name, this will create a relation to a report file stored in your DAM. In this example, the generated reports will be assigned to the users. |
| __fieldrelation_module | module in which the relation is created | |
| __fieldrelation_name | name of the relation |
Note: When creating SQL-statements, please also note our list of further reserved identifiers.
# Testing your report or template
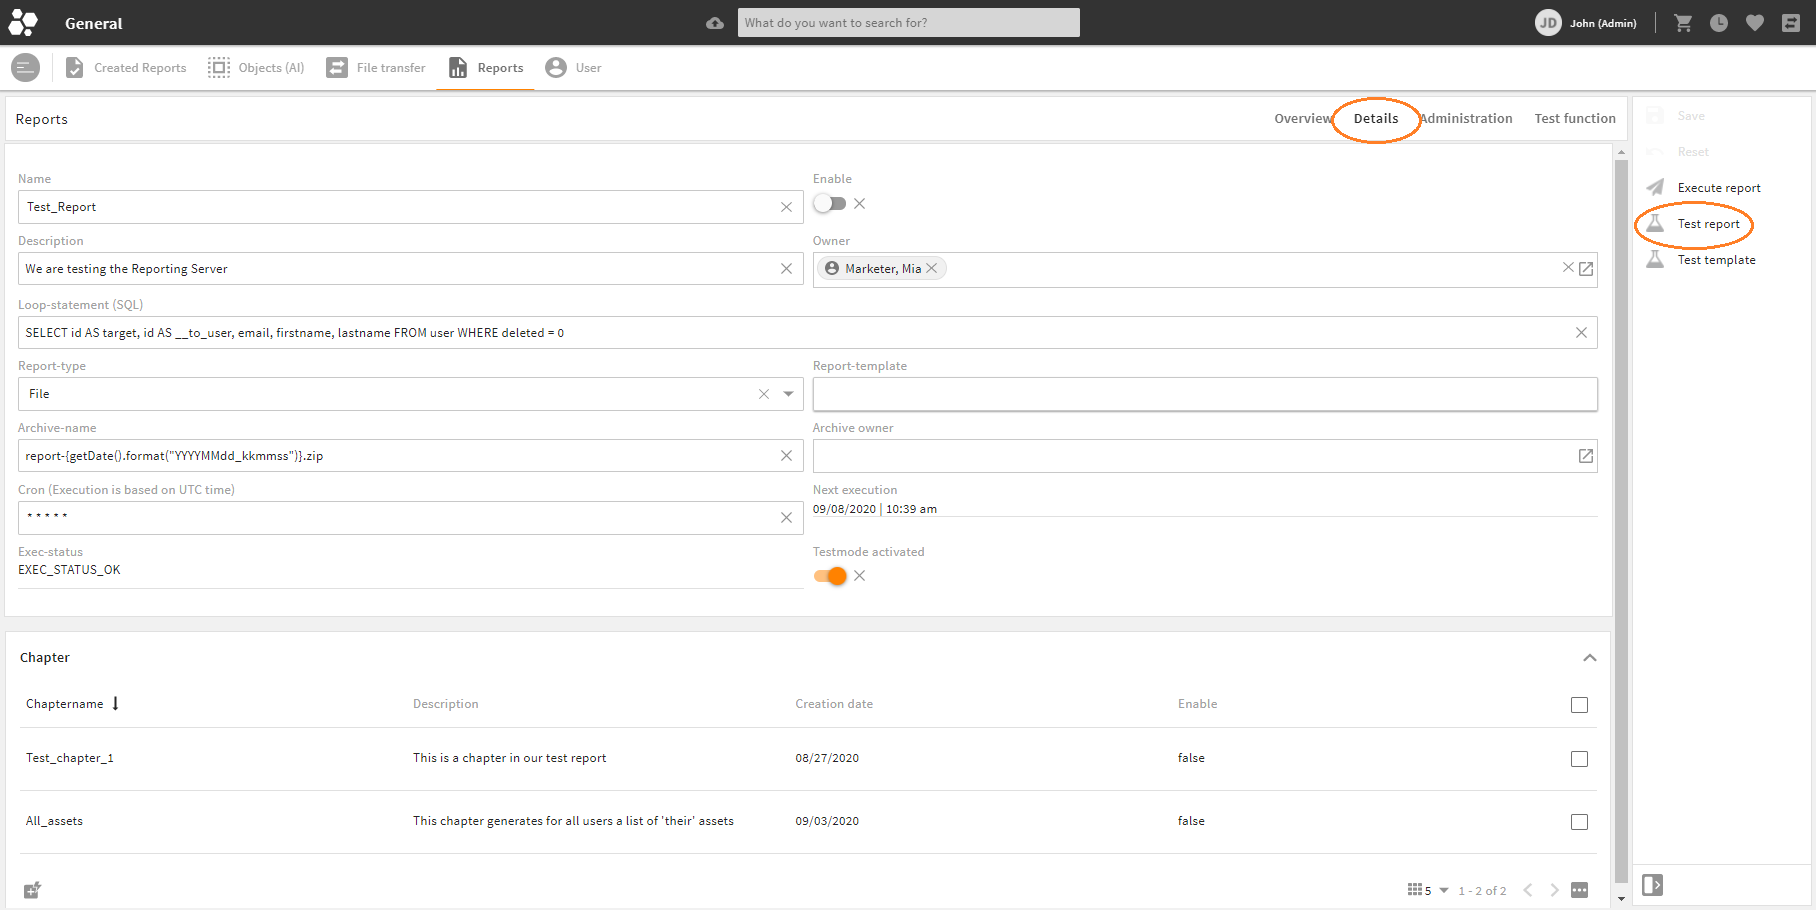
A test function is available for testing your reports and templates in the toolbox on the right.
To test if your report works, open it and click "Test report". Depending on the report type, a direct download of file(s) or an e-mail to the report owner (or the defined "mailreceiver for test") is generated. For details, click the tab "Administration" and have a look at the section Protocol (last exec).
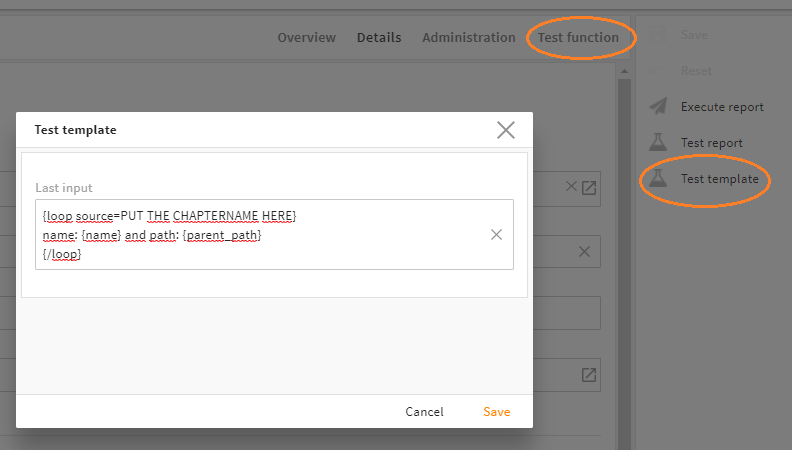
To test templates, click "Test template". A pop-up-window opens where you can enter a template. It is resolved using the data generated by the statements. To see the result, click the tab "Test function" and have a look at the field Result.
# Error handling
You can check the status of the last execution of a report. Click the tab "Administration" and have a look at the field Exec-status:
| status | description |
|---|---|
| EXEC_STATUS_OK | execution OK |
| EXEC_STATUS_WARNING | warning |
| EXEC_STATUS_ERROR | error during execution |
| EXEC_STATUS_ERROR_BREAK | error that led to a stop |
Also, a log is generated. You can find it just below the status in the section Protocol (last exec).
If your report is executed on a scheduled basis using CRON, an e-mail is sent to the owner (owner_user) of a report in case of an error.
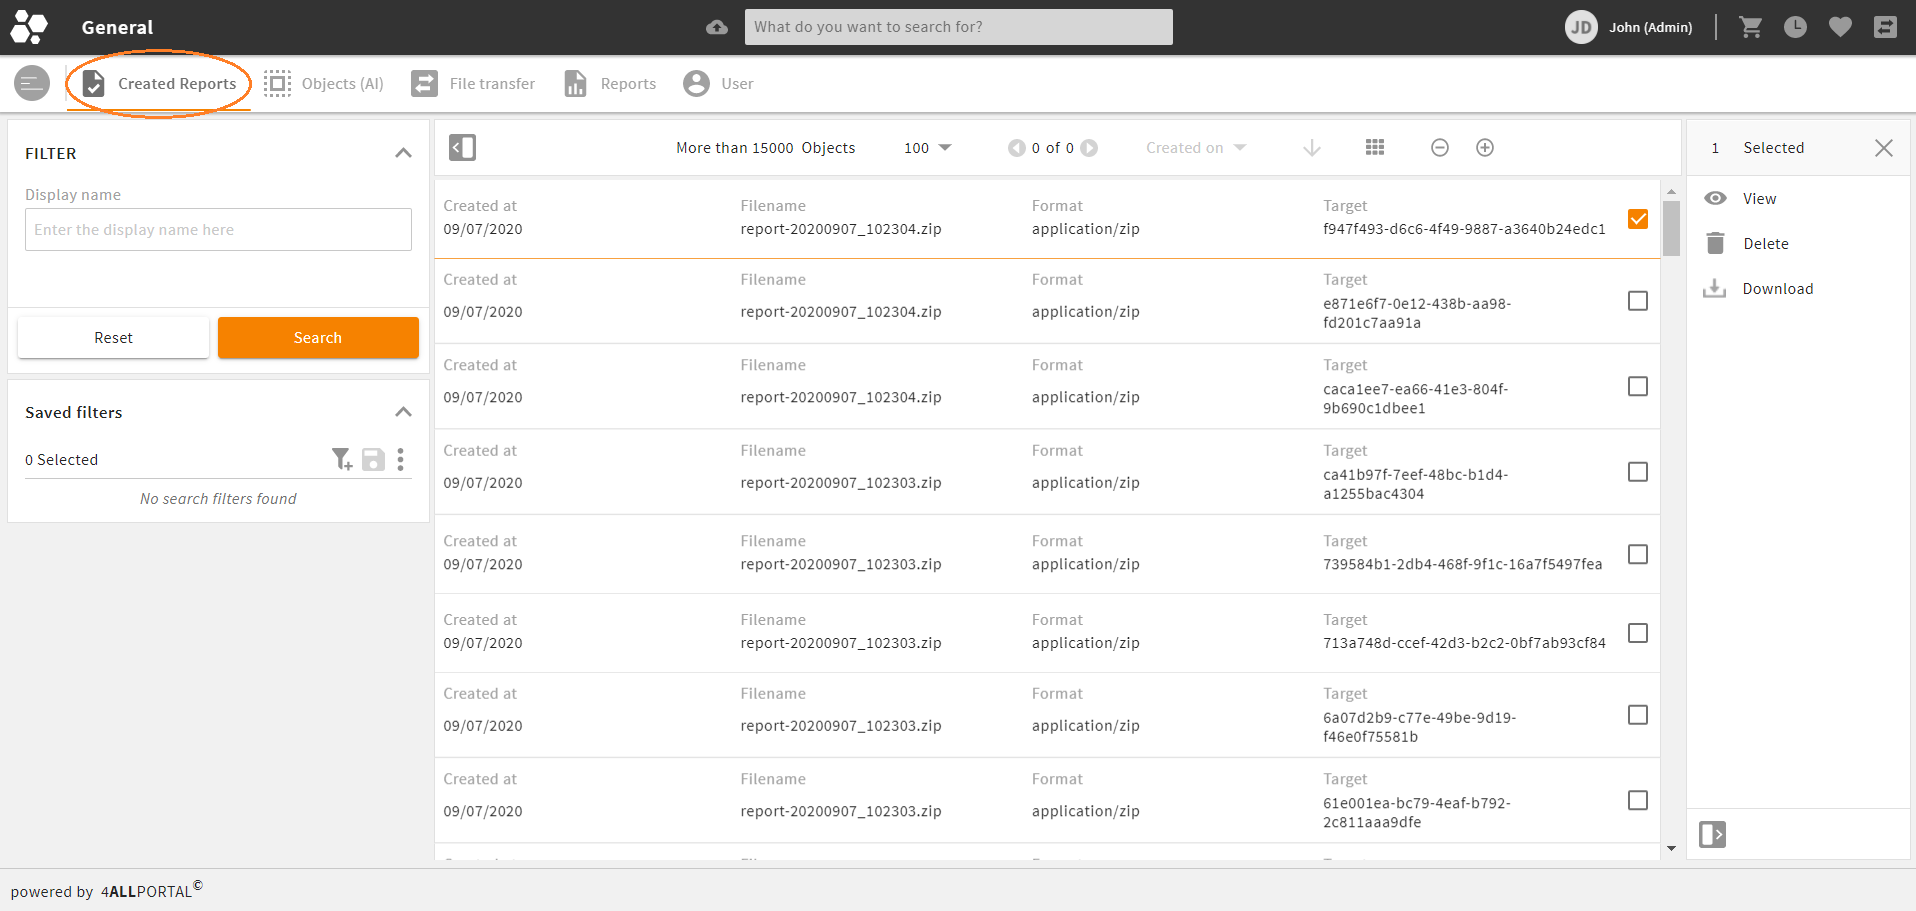
# Created reports
All created reports will be stored. In the module Created reports you get an overview over your generated reports as well as the possibility to search and filter them. By checking the checkbox of a report, you will get the options to get more information, to download a report again or to delete it from the list.
# Examples
# Create an Excel file using a template
Suppose you want to create an Excel document with two sheets once in a month: One sheet should display a list with all exported assets, the other should display a list with all imported (uploaded) assets.
# Step 1: Create a report
Name: monthlylist
Enable: true
Loop-statement (SQL):
SELECT DATE_ADD(NOW(), INTERVAL - 15 DAY) AS target_date, MONTH(DATE_ADD(NOW(), INTERVAL - 1 DAY)) AS target_month, 'en_US' AS __target_lang, DATE_ADD(NOW(), INTERVAL 360 DAY) AS __avail_untilReport-type: File
Report-template: tpl_dam_import_export
Cron:
30 3 1 * *
# Step 2: Create the report chapter "export"
Chaptername: export
Enable: true
Create report file: false
Report-file-template: null
SQL-statement:
  SELECT
       d.id as file_id,
       d.name AS filename,
       d.parent_path AS path,
       IF(file_titel_fc.value IS NULL,
           '-',
           file_titel_fc.value) AS title,
       IF(file_licensor_fc.value IS NULL,
           '-',
           file_licensor_fc.value) AS licensor,
       d.created_time AS creation_date,
       COUNT(DISTINCT dl.id) AS download_count,
       COUNT(DISTINCT et.id) AS eticket_count
   FROM
       file AS d
           LEFT OUTER JOIN
   file_titel_fc ON d.id = file_titel_fc.pid
           LEFT OUTER JOIN
   file_licensor_fc ON d.id = file_licensor_fc.pid
           LEFT OUTER JOIN
   usa_his_ass AS dl ON d.file_id = dl.file_id
          LEFT OUTER JOIN
   usa_his_ass AS et ON d.file_id = et.file_id
   WHERE
       DATEDIFF(NOW(), dl.created_time) = 1
           AND DATEDIFF(NOW(), et.created_time) = 1
           AND dl.deleted = 0
           AND (dl.type = 'default'
           OR dl.type = 'quickdownload')
           AND et.deleted = 0
           AND et.type = 'eticket'
   GROUP BY d.id
   ORDER BY d.parent_path , d.name
# Step 3: Create the report chapter "import"
Chaptername: import
Enable: true
Create report file: false
Report-file-template: null
SQL-Statement:
  SELECT
    d.id as file_id,
    d.name AS filename,
    d.parent_path AS path,
    IF(file_titel_fc.value IS NULL,
       '-',
       file_titel_fc.value) AS title,
    IF(file_licensor_fc.value IS NULL,
       '-',
       file_licensor_fc.value) AS licensor,
    d.created_time AS creation_date,
    COUNT(DISTINCT dl.id) AS download_count,
    COUNT(DISTINCT et.id) AS eticket_count
   FROM
    file AS d
       LEFT OUTER JOIN
    file_titel_fc ON p.id = file_titel_fc.pid
       LEFT OUTER JOIN
    file_licensor_fc ON p.id = file_licensor_fc.pid
       LEFT OUTER JOIN
    usa_his_ass AS dl ON (d.id = dl.data_id AND dl.deleted = 0
           AND (dl.type = 'default' OR dl.type = 'quickdownload'))
       LEFT OUTER JOIN
    usa_his_ass AS et ON (d.id = et.data_id AND et.deleted = 0  AND et.type = 'eticket')
   WHERE
       AND d.deleted = 0
       AND DATEDIFF(now(), created_time) = 1
   GROUP BY d.id
   ORDER BY d.parent_path , d.name LIMIT 10
# Step 4: Define the templates
- Create the template. For further information take a look at our template engine documentation (opens new window).
- Create a template file:
custom/modules/report/templates/tpl_dam_import_export.4aptpl
   <template version="1">
     <default_lang>en_US</default_lang>

     <!-- Required -->
     <file lang="en_US">tpl_dam_import_export_en_US.xlsx</file>
     <file lang="de_DE">tpl_dam_import_export_de_DE.xlsx</file>

     <properties lang="en_US">
       <entry key="output_name">DAM-REPORT_{getDate().format("yyyyMMdd_HHmmss")}.xlsx</entry>
     </properties>

     <properties lang="de_DE">
       <entry key="output_name">DAM-REPORT_{getDate().format("yyyyMMdd_HHmmss")}.xlsx</entry>
     </properties>
     <engine>XLSX</engine>

   </template>
- Create the Excel template file:
custom/modules/report/templates/resources/tpl_dam_import_export.xlsx
Sheet "import":
| filename | filepath | creation date | title | file-ID | downloads |
|---|---|---|---|---|---|
| {loop source=import} | |||||
| {filename} | {path} | {date source="$creation_date" format="dd.MM.yyyy"} | {title} | {file_id} | {download_count} |
| {/loop} |
Sheet "export":
| filename | filepath | creation date | title | file-ID | downloads |
|---|---|---|---|---|---|
| {loop source=export} | |||||
| {filename} | {path} | {date source="$creation_date" format="dd.MM.yyyy"} | {title} | {file_id} | {download_count} |
| {/loop} |
# Create an e-mail with two attachments
Suppose you want each user of your 4ALLPORTAL to receive an e-mail with two attachments: A list with all DAM assets that were edited by the user. And another list with all DAM assets that were last edited and then deleted by the user.
# Step 1: Create a report
Name: Usage_by_user
Enable: true
Loop-statement (SQL):
SELECT id AS __to_user FROM user WHERE deleted = 0Report-type: Mail
Report-template: tpl_dam_usage
Cron:
30 3 * * *
# Step 2: Create the report chapter "Chapter_A"
Chaptername: Chapter_A
Enable: true
Create report file: true
Report-file-template: edited_by_xlsx
SQL-Statement:
  SELECT
   id,
   parent_path,
   name,
   size,
   file_mod_time
  FROM
   file
  WHERE
    deleted = 0
      AND mod_by = {sqlv source=__to_user }
   LIMIT 2000
# Step 3: Create the report chapter "Chapter_B"
Chaptername: Chapter_B
Enable: true
Create report file: true
Report-file-template: deleted_by_xlsx
SQL-Statement:
  SELECT
   id,
   parent_path,
   name,
   size,
   file_mod_time
  FROM
   file
  WHERE
   deleted = 1
      AND mod_by = {sqlv source=__to_user }
   LIMIT 2000
# Step 4: Define the templates
- Create the template file:
custom/modules/report/templates/tpl_dam_usage.4aptpl
    <template version="1">
     <default_lang>en_US</default_lang>

     <!-- Required -->
     <file lang="de_DE">tpl_dam_usage.de_DE.html</file>
     <file lang="en_US">tpl_dam_usage.en_US.html</file>

     <!-- Optional -->
     <properties lang="de_DE">
       <entry key="mail_subject">Eine E-Mail für {__target_firstname} {__target_lastname}</entry>
     </properties>

     <properties lang="en_US"> <!-- or default -->
       <entry key="mail_subject">An email for {__target_firstname} {__target_lastname}</entry>
     </properties>
    </template>
- Create the e-mail template file:
custom/modules/report/templates/resources/tpl_dam_usage.en_US.html
    <html xmlns="http://www.w3.org/1999/xhtml" xml:lang="de" lang="de">
      <head>
         <meta http-equiv="X-UA-Compatible" content="IE=EmulateIE7"/>
         <meta http-equiv="Content-Type" content="text/html; charset=utf-8"/>
         <title>DAM-Usage</title>
      </head>
      <body>
         <div class="wrapper">
             <div class="content">
                 Dear {__target_firstname} {__target_lastname},
                 <br>
                 <br>
                 attached to this e-mail are two reports about your usage of the DAM.
             </div>
         </div>
      </body>
    </html>
To execute the Excel templates see our first example above.
# Use a conditional operation to generate a report
If you want to generate a report directly out of a specific module (e.g. to create a report from a selection of DAM or PIM assets like a product list, a file list, a list with the contents of a specific folder ...), you can use a conditional operation (action).
For this, you need to create a corresponding config XML. The type of the action is INSTANT_CALL. This allows to execute a specific report. When the report has been created, it is downloaded directly.
- Create the configuration-file for the conditional operation, e.g.:
/custom/modules/product/actions/export_product_list.xml
    <action>
      <conditions>
        <condition>
          <value1 type="feature">
            <value>{module_name}.report</value>
          </value1>
          <value2 type="value">
            <value>true</value>
          </value2>
        </condition>
      </conditions>
      <label>Generate product list</label>
      <method>INSTANT_CALL</method>
      <icon>report</icon>
      <min_beans>0</min_beans>
      <classname>com.cm4ap.ce.report.action.ExecuteReport</classname>
      <parameter>
        <entry>
          <key>report_id</key>
          <value>0074b049-e83f-4701-a919-e9bcd4beae61</value>
        </entry>
      </parameter>
    </action>
If you want to allow users to specify parameters or allow him to choose a report use an action of type FORM. When the report has been created, it is downloaded directly.
- Create the configuration-file for the conditional operation, e.g.:
/custom/modules/product/actions/export_product_list.xml
    <action>
     <conditions>
       <condition>
         <value1 type="feature">
           <value>{module_name}.report</value>
         </value1>
         <value2 type="value">
           <value>true</value>
         </value2>
       </condition>
     </conditions>
     <label>Generate product list</label>
     <method>FORM</method>
     <icon>report</icon>
     <min_beans>0</min_beans>
     <classname>com.cm4ap.ce.report.action.ExecuteReport</classname>
     <renderers>
       <renderer>
         <column_count>0</column_count>
         <label>text-module-Export</label>
         <tooltip/>
         <label_placement>top</label_placement>
         <show_action_button>true</show_action_button>
         <group_renderer_list>
           <group_renderer>
             <type>flat</type>
             <label>Export for:</label>
             <tooltip/>
             <field_renderer_list>
               <field_renderer>
                 <!-- here you assign the selected report -->
                 <type>Reference</type>
                 <read_only>false</read_only>
                 <label>Output type</label>
                 <default_value>1</default_value>
                 <field_renderer_attributes>
                   <entry class="string" key="module">report</entry>
                   <entry class="string" key="display_field">friendlyname</entry>
                 </field_renderer_attributes>
                 <field>
                   <type>CEId</type>
                   <name>report_id</name>
                 </field>
               </field_renderer>
               <field_renderer>
                 <!-- the output language is defined here as an example -->
                 <label>Language</label>
                 <field>
                   <type>CEVarchar</type>
                   <name>lang</name>
                 </field>
               </field_renderer>
             </field_renderer_list>
           </group_renderer>
         </group_renderer_list>
       </renderer>
     </renderers>
     <parameter/>
    </action>
You can use form parameters in SQL-statements as well as in e-mail and file templates.
They are prefixed with request_formparam_. By this, the parameter lang from the statement's action is called as request_formparam_lang:
select {sqlv source=request_formparam_lang} as __target_lang
If assets are selected when calling the conditional operation, they are available in the parameter target_ids.
If you want to create a list of the selected assets or of all assets if none were selected, this can be achieved in the following way:
SELECT
   *
FROM
   product
WHERE
   product.deleted = 0
{if target_ids}
   and product.id in
(
'padding',
{loop source=target_ids}'{_entry}', {/loop}'padding'
)
{/if}
# Extension for the template engine
If you want to read a bean from the database, use get_single_fl.
Syntax: get_single_fl(module, id, fielddList, dimensions)
Parameter:
| name | type | optional? | default | description |
|---|---|---|---|---|
| module | string | no | none | name of the module |
| id | string | no | none | asset id |
| fieldList | string | no | none | comma-separated list |
| dimensions | string | yes | none | list of dimensions using the format: DimensionsKey1 : Dimensionscontent1, DimensionsKey2 : Dimensionscontent2, ... |
Example:
Assume that foo has assigned the value foo, bar ...
- {get_single_fl("file", "12345", "name,description").description} will deliver the content of "description"
- {get_single_fl("file", "12345", "name,description", "lang:en_US, channel:web").description} will deliver the english content of "description" in output channel "web".
# References
# Data structure of a report
Before a report is generated, the data of all report chapters is determined. This data can then be used in the e-mail and document templates.
Example (according to our import-export-report above):
{
  "report_name": "montly",
  "report_cron": "30 3 1 * * ",
  "report_last_start": "2020-02-14T15:58:05.000Z",
  "report_last_end": "2020-02-14T16:00:43.000Z",
  "report_owner_user": "157",
  "report_file_tpl": "",
  "report_enable_hist": true,
  "report_file_nam_tpl": "Report {$target_date\" format\u003d\"yyyy\"}.xlsx",
  "report_hist_user": "153",
  "report_next_exec": "2020-03-01T03:30:00.000Z",
  "report_provide_as": 1,
  "report_file_type": "xlsx",
  "report_id": "report_monthly",
  "report_hist_role": "4a807854-7eac-4a82-8078-547eac8a82e8",

  "import_name": "import",
  "import_statement": "SELECT ...ORDER BY d.parent_path , d.name",
  "import_description": "import of previous month",
  "import_create_file": false,
  "export_name": "export",
  "export_statement": "SELECT ...ORDER BY d.parent_path , d.name",
  "export_description": "downloads and eTickets of previous month",
  "export_create_file": false,

  "target_month": 2,
  "__avail_until": "2021-08-15T00:00:00.000Z",
  "target_date": "2020-01-30T00:00:00.000Z",
  "__exec_start_time": "2020-02-14T16:04:25.000Z",
  "__target_id": "default",
  "__target_lang": "en_US",

  "chapter_names": [
     "import",
     "export"
  ],
  "import": [{
     "path": "111",
     "licensor": "-",
     "filename": "01.jpg",
     "file_id": "data_20170130155650_B945938338DB376C42089BCA1084B3F2",
     "created_time": "2017-01-30T00:00:00.000Z",
     "title": "-",
     "eticket_count": 0,
     "download_count": 0
  }, {
     "path": "afi_73",
     "licensor": "-",
     "filename": "025075_TK_Himbeeren_offe_1b.jpg",
     "file_id": "data_20160407115817_BACFB546D48930F3FFAE39C8C2CDB92A",
     "created_time": "2017-01-11T00:00:00.000Z",
     "title": "-",
     "eticket_count": 0,
     "download_count": 0
  }],
  "export": [{
     "path": "afi_73/123",
     "licensor": "-",
     "filename": "183915.1.JPG",
     "file_id": "data_20170117094035_41F3D53FD9AB6DD6FFEDAED15D6F3E4C",
     "created_time": "2017-01-17T00:00:00.000Z",
     "title": "-",
     "eticket_count": 1,
     "download_count": 1
  }, {
     "path": "eig5_1/ul3",
     "licensor": "-",
     "filename": "image_ 100.png",
     "file_id": "data_20161107154540_C2345E9841380B92D9CA8474F096B301",
     "created_time": "2017-01-11T00:00:00.000Z",
     "title": "-",
     "eticket_count": 2,
     "download_count": 1
  }]
}
# Further identifiers
To show the field contents of the current report use these reserved identifiers:
- report_archive_name_tpl
- report_created_by
- report_created_time
- report_cron
- report_debug_mode
- report_description
- report_email_tpl
- report_enable_hist
- report_enabled
- report_exec_status
- report_file_nam_tpl
- report_file_tpl
- report_file_type
- report_friendlyname
- report_hist_role
- report_hist_user
- report_id
- report_last_end
- report_last_error_message
- report_last_exec_status
- report_last_result
- report_last_start
- report_lock_until
- report_loop
- report_mod_by
- report_mod_time
- report_name
- report_next_exec
- report_owner_role
- report_owner_user
- report_provide_as
- report_template
- report_test_mailto
- report_test_mode
To show the field contents of the user or contact module use these reserved identifiers. The metadata from the user or contact module is automatically added and put to the fields "__target_firstname" etc.
- __target (prefix for the corresponding module fields of the first receiver from the user or contact module)
- __target_id (fields from the first receiver of the user module)
- __target_created_by
- __target_created_time
- __target_department
- __target_disabled
- __target_email
- __target_ext_id
- __target_failed_login_attempts
- __target_firstname
- __target_friendlyname
- __target_language
- __target_last_login
- __target_lastname
- __target_locale
- __target_logged_in
- __target_mobile
- __target_mod_by
- __target_mod_time
- __target_mod_time_img
- __target_owner_role
- __target_owner_user
- __target_phone
- __target_role
- __target_salutation
- __target_sex
- __target_time_zone
- __target_title_acad
- __target_title_job
- __target_type
- __target_username