# How to Configure Webhooks
# What are Webhooks?
Webhooks are HTTP requests meant to send/receive information from a source application to a target application. Webhooks create notifications in the target application automatically as soon as a defined event is triggered in the source application. For each webhook, one or multiple trigger events can be defined.
The 4ALLPORTAL can serve as the source application for webhooks. It can provide trigger events that lead to notifications in a target application.
You could, for example, configure a webhook that posts a message in a Microsoft Teams channel as soon as a new task is created in the 4ALLPORTAL, and another message as soon as a collection is modified.
For a webhook, you need to configure both the target application (e.g., Microsoft Teams), and the source application (e.g, the 4ALLPORTAL). Since the source application requires a URL from the target application, the webhook configuration starts in the target application.
# Step 1: Configure Target Application
Each application offering or managing webhooks (e.g., Microsoft Teams, Workato, Zapier, ...) has its own way to configure webhooks and its own requirements. For example, Microsoft Teams requires to receive an individual POST body from the source application. Please inform yourself about the details in the respective application's documentation.
In most cases, you just need to activate webhooks or create a new one. In each case, a callback URL is required. It needs to be created in this first step to proceed on the 4ALLPORTAL-side configuration.
A callback URL may look like this:
https://mycompany.webhook.office.com/webhookb2/6b76fd96-8860-416f-a1f5-62b179d24396@a7d115c8-1a2b-40e8-bc89-5e2a2e1169ae/IncomingWebhook/479b1875edc647579794678d3f157920/5ae0c34c-f3df-42b9-ac0d-1d1ab21b7b62
Examples
# Step 2: Configure Webhook in 4ALLPORTAL
To configure the webhook in the 4ALLPORTAL, you require the callback URL from the target application. With the callback URL, you can create one webhook. To it, you can add multiple 4ALLPORTAL trigger events in step 3.
# Enable CORS
To enable webhooks for the target application, you first need to allow CORS for its URL:
- Go to admin snap-in
General system configurations/System settings/Security. - In field "CORS allowed origins", add the origin from your specific target application, (e.g., "https://mycompany.webhook.office.com").
- Save and clear the configuration cache.
# Create a Webhook
To create a webhook for a target application, go to admin snap-in Developer/Webhooks/All Webhooks. Click "Create" for the following options:
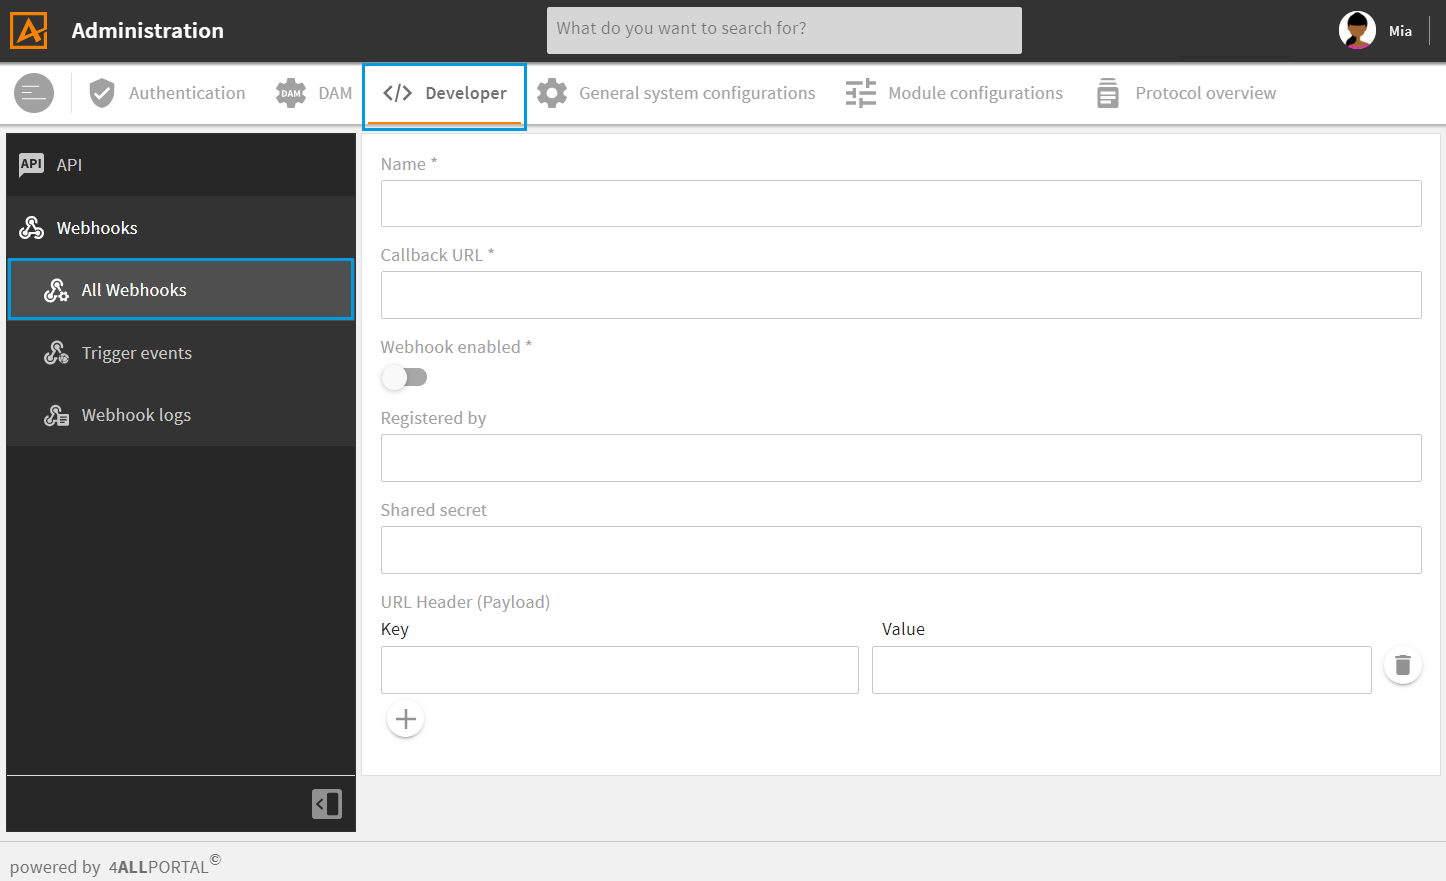
| Name | Description |
|---|---|
| Name * | Enter a webhook name. Allowed are only lowercase letters and underscore _. |
| Callback URL * | Enter the callback URL you got from the target application. |
| Webhook enabled | Set to true if you want to activate the webhook. |
| Registered by | If required, enter the target application's URL. |
| Shared secret | If required, enter the secret code for incoming webhooks you got from the target application. |
| URL Header (Payload) | If required, enter a JSON object for a payload via URL header to the target application. |
* required field
Enter at least a name and the callback URL from the target application.
After saving your webhook, you can add one or more trigger events. With one webhook and multiple trigger events, you can already cover a lot of notification scenarios for one target application.
# Step 3: Configure Trigger Event in 4ALLPORTAL
To create one or more trigger event(s) for your webhook, click the "+" button in a webhook's subpanel "Webhook trigger events", or go to admin snap-in Developer/Webhooks/Trigger events. Click "Create" for the following options:
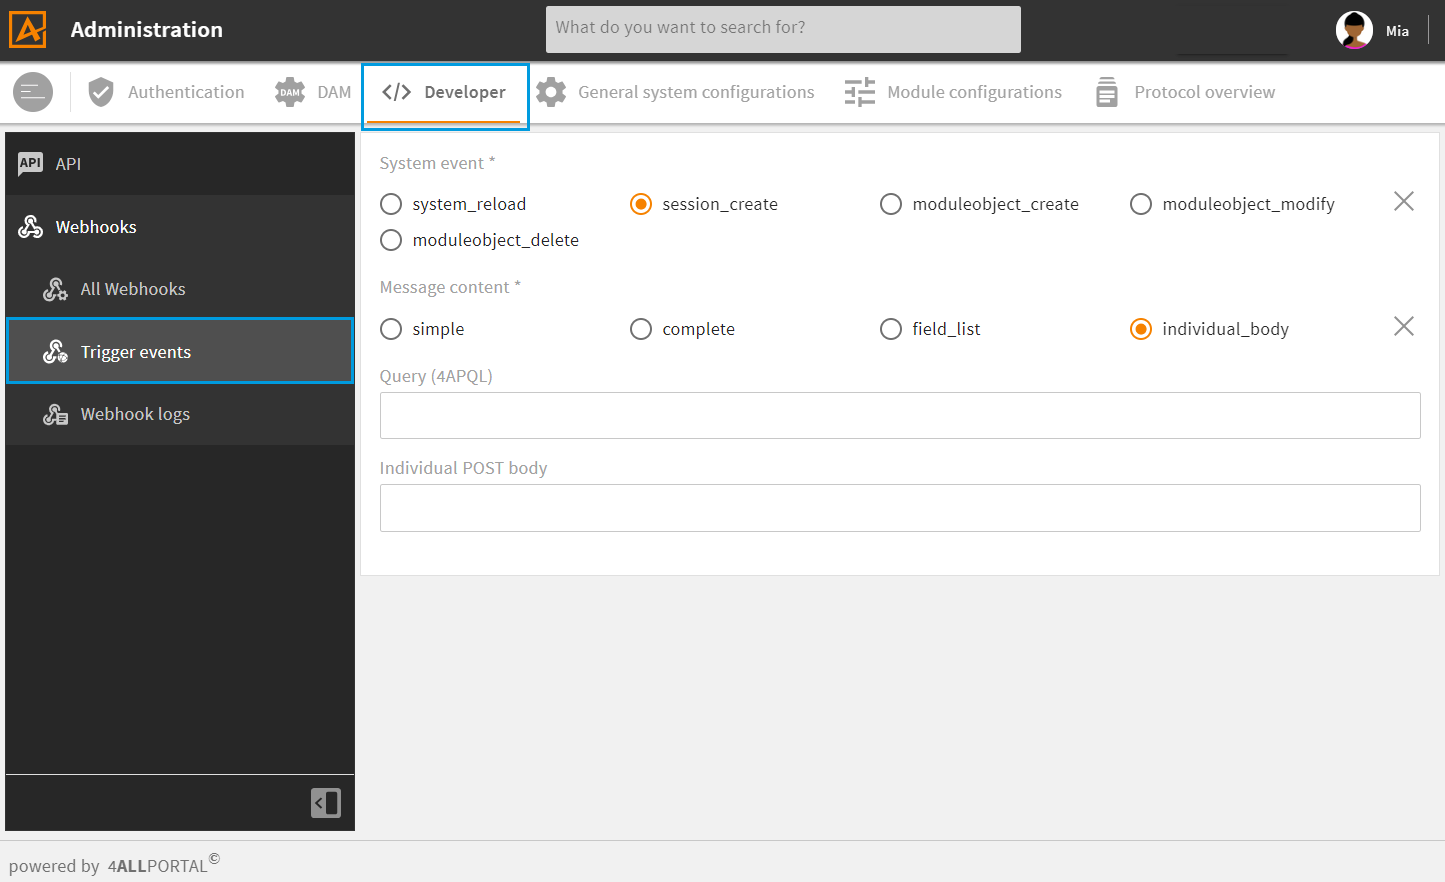
| Name | Description |
|---|---|
| System event * | The event type selected here will be the trigger for the webhook, e.g. the creation or modification of a module's object. |
| Message content * | Select the type of content you want to submit to the target application (more details). |
| Query (4APQL) | Enter a string of query language 4APQL to create an event filter (more details). |
| Individual POST body | If the target application expects an individual POST body, you can configure it here (more details). |
* required field
Select at least the type of system event and the type of message content.
# Message Content
The message content defines the source application information submitted to the target application after a defined system event triggered. E.g., for types "moduleobject_", the respective object's information.
- simple: Submits the basic information of a module's object. E.g., for an object of module "mail", the basic information are:
{ "id": "401dc48b-f30c-4672-9dbf-dac4accad62b", "module": "mail", "type": "f_collection_changed", "mod_time": "2023-06-05T08:32:02.505Z" } - complete: Submits all field information available for a module's object.
- field_list: Submits only the selected fields' information for a module's object. The fields can be selected after clicking "field_list".
- individual_body: Submits only the information for a module's object that are explicitly defined in field "Individual POST body".
Further information
You can check the basic information submitted for each module's object using our API (Swagger documentation (opens new window)).
# Query (4APQL)
In field "Query (4APQL)", you can enter a database query string in query language 4APQL. You can use the query to further define the trigger event. For example, you can limit the trigger to only modified objects from a specific filetype or folder.
Please note: 4APQL only works reliably from Core version 4.0 or higher.
Example Queries:
- Limit to a specific media type:
mimetype = 'image/jpeg', ormimetype LIKE 'image/%' - Limit to a specific folder:
mount = 'data' AND parent_path = 'flyer_24', ormount = 'data' AND (parent_path = 'flyer_24' OR parent_path LIKE 'flyer_/%')
Further information
# Individual POST Body
With the individual POST body you define the actual message posted in the target application, e.g. "The following file was modified: flyer_books_q4.pdf", or "New user session started".
The target application may not require an individual POST body. If it does (e.g., Microsoft Teams), please consider the syntax expected from the application.
When entering the body, you can use the 4ALLPORTAL Template Engine functions. With it, you can consider an object's information in the notification text, e.g., its friendlyname.
Example POST body (as used for a Teams webhook):
{"text":"modify: \{if message.moduleObject.properties.friendlyname && message.moduleObject.properties.friendlyname.value\}friendlyname=\{message.moduleObject.properties.friendlyname.value\}\{else\}id=\{message.moduleObject.id\}\{/if\}""}
This would result in: "modify: friendlyname=flyer_books_q4.pdf"
Syntax Rules:
{and}: need to be escaped with\"": template engine functions need to be closed with double""(see example above)
Further information
# Step 4: Complete Configuration in Target Application
Depending on your target application, you may finish your webhook configuration. For Microsoft Teams, for example, no further steps are required (approaches for other applications).
# Example: Webhook for Microsoft Teams
As an example, we want to add a webhook in our Teams channel "General". Each time a user session is started in the 4ALLPORTAL, we want a notification in Teams.
Teams Specification: Microsoft Teams requires an individual POST body from the source application. Without defining it in the Trigger configuration, the webhook will not work.
# Add Webhook to Teams Channel
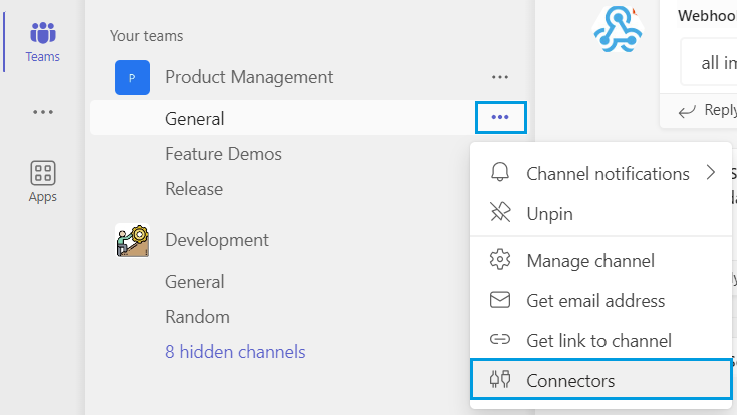
Open Teams and select the team's channel in which you want to receive a notification (e.g., "General").
Click the "More"-Button on that channel's right side and select "Connectors".
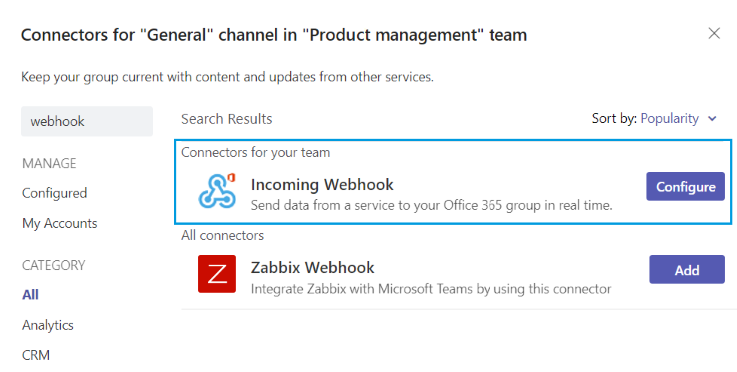
Search for "Incoming Webhook" and click "Add".
Look for "Incoming Webhook" again. You now have the option to click "Configure".
Enter a name, an image (optionally) and click "Done". Teams now offers a callback URL to copy.
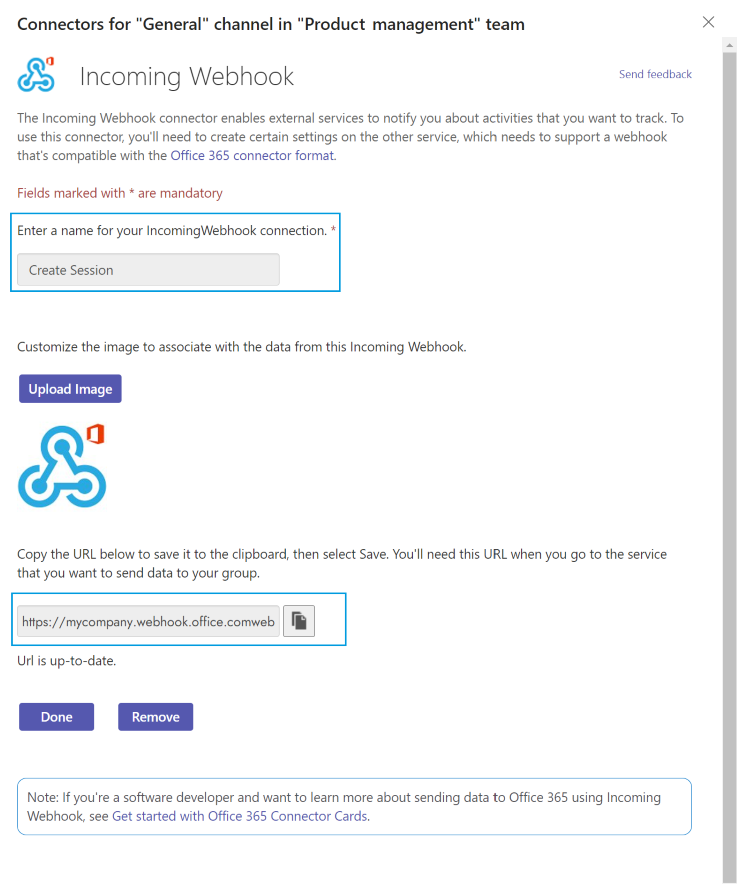
Copy (or store) the callback URL. You can now switch to the 4ALLPORTAL.
# Configure Webhook in 4ALLPORTAL
# Enable CORS
- Go to admin snap-in
General system configurations/System settings/Security. - In field "CORS allowed origins", add "https://mycompany.webhook.office.com" (respectively the origin from your specific target application).
- Save and clear the configuration cache.
# Create a Webhook
- Go to admin snap-in
Developer/Webhooks/All Webhooks. Click "Create" and make the following settings: - Name: Create Session
- Callback URL: Enter the URL given to you in Teams.
- Webhook enabled: True
- Save your settings.
After saving your webhook, you need to add a trigger event.
# Configure Trigger in 4ALLPORTAL
- Go to admin snap-in
Developer/Webhooks/Trigger events. Click "Create" and make the following settings:- System event: session_create
- Message content: individual_body
- Individual POST body: {"text":"A session was created""}
- Save your settings.
- Go to webhook "Create session". Add this trigger in subpanel "Webhook trigger events" and save.
- Go back to your trigger. Click "Test webhook". A toast should confirm that your test was successful.
# Complete Configuration in Teams
In Teams, no further configuration is required. When checking the Teams channel after testing your webhook, you should already see defined message "A session was created".
# Approaches for Other Applications
In the following example applications, follow the described steps to receive the required callback URL:
- Workato: Click: Recipes / Create a new recipe / Webhooks / Start guided setup / Enter name / Next
- Zapier: Click: Make a Zap! / Enter name / Choose App & Event: Webhooks / Choose Trigger Event: Catch Hook
- MS Power Automate: Click: Create / Direct Flow / When an HTTP request is received / New step (e.g., select "Post message") / Save Flow
After you got the callback URL, you need to configure the 4ALLPORTAL like described above. To complete the configuration after you configured the 4ALLPORTAL, follow these steps:
- Workato: After testing, you can configure different apps using "Trigger" and "Actions".
- Zapier: Click: Continue / Test & Continue / Trigger event in 4ALLPORTAL / After testing, you can configure different apps using "When this happens" and "Do this".
- MS Power Automate: Click: Test flow / Trigger event in 4ALLPORTAL
Please note: Each application has its own requirements for webhooks. Read their documentation carefully and consider the required information when configuring a webhook in the 4ALLPORTAL.
# Troubleshooting
If your webhook does not work/trigger, check the following:
- Did you add the target application's URL to CORS allowed origins?
- Did you add the trigger to the webhook?
- Is your webhook enabled?
- Are there any syntax mistakes in your filter query?
- Are there any syntax mistakes in your individual POST body (e.g., missing double
""at a Template Engine function)?