# Value Options
With value options, users get the option to make a selection from multiple predefined values. They can be implemented in different ways and places in your system, e.g. with checkboxes in a search to specify a search result or with a drop-down in a record's detail view to choose only one of multiple given options:
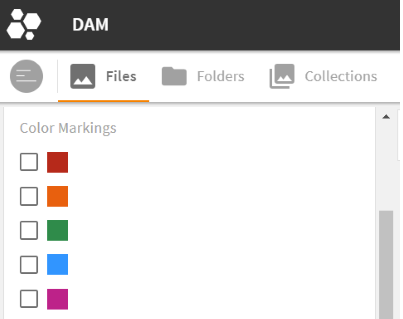
value options in a search
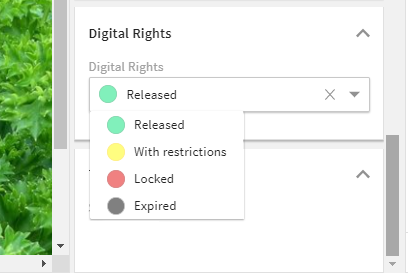
value options to decide on one digital rights value
# Storage and Reading Order
# Storage
Value options are XML files stored in either global/value_options (for global value options) or modules/{module}/value_options (if they are module specific).
The file name is also the name of the value option required for implementing, e.g. mimetypes.xml or star_rating.xml.
<keys>
  <key>10</key>
  <key>25</key>
  <key>100</key>
  <key>250</key>
</keys>
Global value option "search_paging.xml" with four values
In the GUI, admin snap-ins Module configurations/{module}/Value Options give you an overview of all value options created for a specific module, with their XML name and keys.
Note that global value options (from global/value_options) cannot be managed in the GUI.
Value Options are always available across modules, and they can be implemented throughout the system regardless of their storage folder. A value option stored in module user can as well be used in module file.
To keep track, we recommend creating:
- global value options if your value options are useful for more than one specific case
- module specific value options if your value options are specific and used only in the respective module
# Reading Order
During system startup, value options read out later overwrite already read values. The reading is done in the following order:
- from global
- from all modules in alphabetical order
This means:
- Value options from module
accountoverwrite value options with the same name from folderglobal - Value options from module
contactoverwrite value options with the same name fromaccount
# How to Implement Value Options in your System
To display value options like shown above in your system, you need to
- create the value option file with value keys (XML file), and add optional icons
- translate the name and the keys (.properties file)
- implement it in an object renderer (.4aprenderer file) and choose their display
Following these steps, you can create new value options as well as change existing ones (e.g. add or remove values or to implement it somewhere else).
# Create Value Options
You can create a new value option directly in your file system by creating a new XML file. Or you can use admin snap-in Module configurations/{module}/Value Options, toolbox action "Create".
Note that creating a value option in the snap-in automatically creates the corresponding XML in your file system.
For a new value option, all you need to do is to define a name (only lower case letters and underscore allowed), and the keys which represent the single values:
<keys>
    <key>unlocked</key>
    <key>with_restrictions</key>
    <key>locked</key>
    <key>expired</key>
</keys>
Files specific value option release_status.xml in the file system
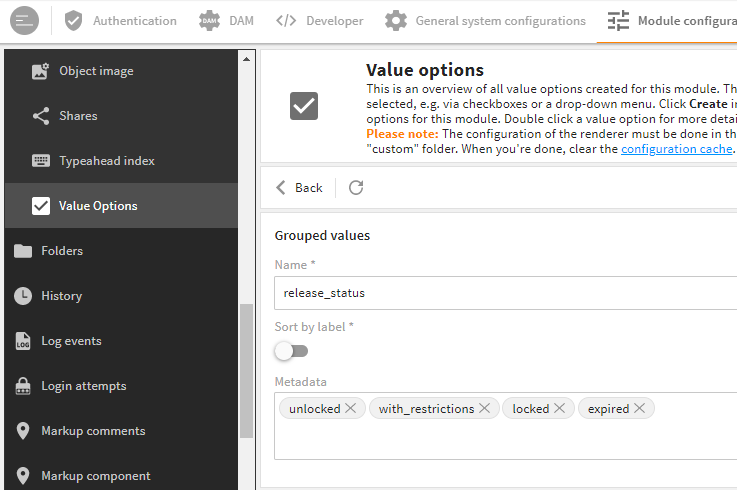
value option "release_status" in the admin snap-in
value option "release_status" implemented in the GUI
# Sorting of Values
The order in which the keys are listed in either your XML, or your snap-in entry represent the order in which the values are displayed in the GUI.
If you want to sort them according to their label translation, activate button "Sort by label" or add parameter <keys sort="true"> to your XML:
<keys sort="true"> <!-- default: false -->
 <key>yes</key>
 <key>no</key>
</keys>
As a result, the values are no longer sorted in their actual order, but alphabetically according to their translation in the .properties file:
"release_status" without sorting
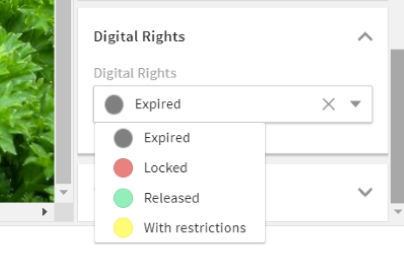
"release_status" with alphabetical label sorting
# Value Option Groups
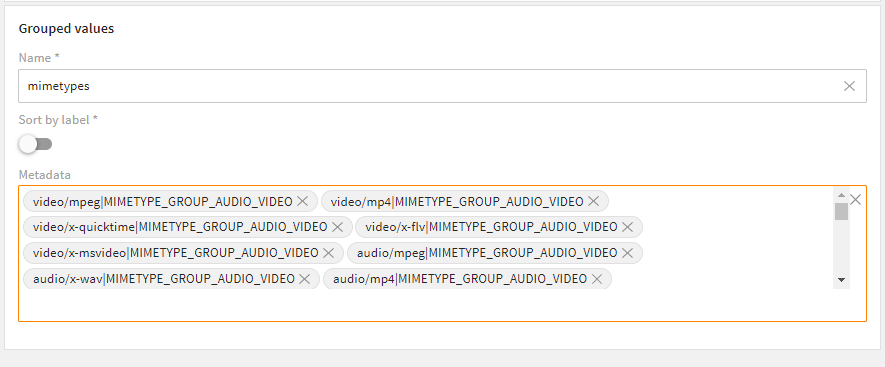
If you want to sort your values into groups, you must define them in your XML/admin snap-in by
- adding tag
<key group="{group key}">(XML) - adding
|(pipe) followed by the group key (snap-in)
<keys>
   <key group="MIMETYPE_GROUP_AUDIO_VIDEO">video/mpeg</key>
   <key group="MIMETYPE_GROUP_AUDIO_VIDEO">video/mp4</key>
   <key group="MIMETYPE_GROUP_AUDIO_VIDEO">video/x-quicktime</key>
   <key group="MIMETYPE_GROUP_AUDIO_VIDEO">video/x-flv</key>
   <key group="MIMETYPE_GROUP_AUDIO_VIDEO">video/x-msvideo</key>
   <key group="MIMETYPE_GROUP_AUDIO_VIDEO">audio/mpeg</key>
   <key group="MIMETYPE_GROUP_AUDIO_VIDEO">audio/x-wav</key>
   <key group="MIMETYPE_GROUP_AUDIO_VIDEO">audio/mp4</key>
   <key group="MIMETYPE_GROUP_AUDIO_VIDEO">audio/ogg</key>

   <key group="MIMETYPE_GROUP_LAYOUTS">application/x-indesign</key>
   <key group="MIMETYPE_GROUP_LAYOUTS">application/vnd.adobe.indesign-idml-package</key>
   <key group="MIMETYPE_GROUP_LAYOUTS">application/sketch</key>

   <key group="MIMETYPE_GROUP_DOCUMENTS">application/pdf</key>
   <key group="MIMETYPE_GROUP_DOCUMENTS">text/plain</key>

</keys>
grouping in value option "mimetypes.xml"
grouping in the admin snap-in
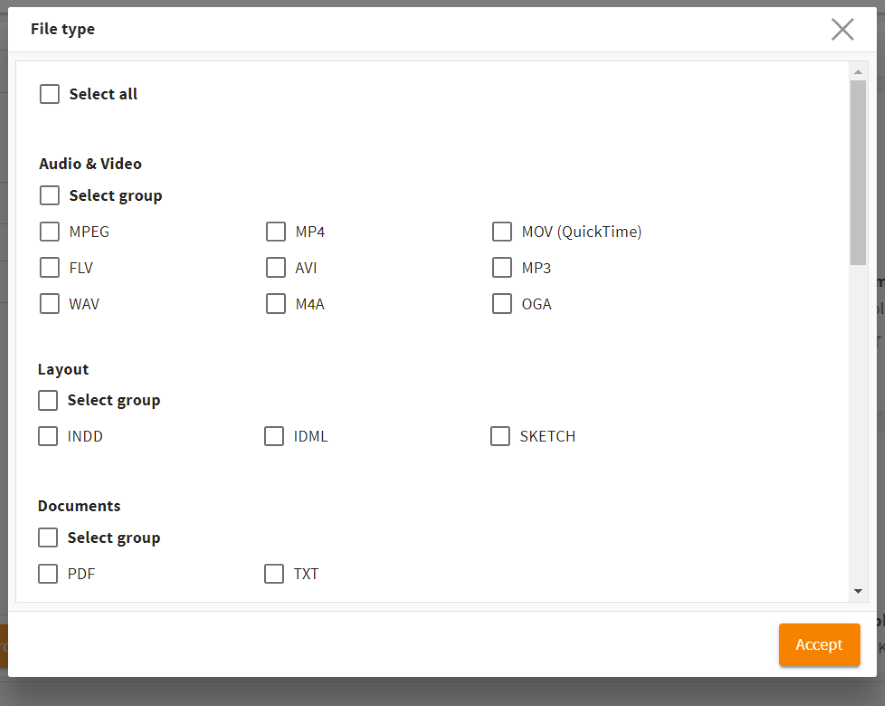
implemented in a pop-up in the GUI
Please note: Don't forget to translate the group label keys together with the value label keys. The label key syntax is L-V-G-VALUEOPTIONNAME-VALUEGROUPNAME.
Sorting in Groups
If your value option is divided into groups, the sorting with <keys sort="true"> will also sort the groups alphabetically according to their label translation.
# Value Option Icons
Each value option key can be (but must not) assigned an icon. Icon keys are generated automatically, following this syntax: V-{VALUEOPTION-NAME}-{VALUEOPTION-KEY}.
Example: V-COLOR_MARKING-#BF2626, V-COLOR_MARKING-#F25F29 etc.
If you want to display an icon next to its value, you must:
store it as a
.4apiconfile in the global or corresponding module'sstylesfolder.
Example:V-COLOR_MARKING-#BF2626.4apicon, redirecting to the actual .svg file in foldericon_library, e.g. "square_BF2626.svg".<svg> <redirect>icon_library/square_BF2626</redirect> <svg>content of file
V-COLOR_MARKING-#BF2626.4apiconin folder/modules/file/styles/defaultset parameter
<entry key="show_icon">true</entry>in the respective object renderer you implemented your value options (details on implementing).
# Icon Fallback
If parameter <entry key="show_icon">true</entry> is set to "true", but no corresponding icon was stored, the default fallback icon will be displayed:

For all details on icons, the styles folder, and the icon library, compare our icon documentation.
# Translate Value Options
Value option keys must be translated in a .properties file in either the global (for global value options) or the module's specific locale folder, e.g. "general.properties" in folder global/locale/en_US or "eticket_editor.properties" in folder modules/filetransfer/locale/en_US.
The label syntax for value option keys is L-V-{VALUEOPTIONNAME}-{VALUE}.
<keys>
  <key>upload_historical</key>
  <key>eticket</key>
  <key>download_link</key>
  <key>cart_historical</key>
  <key>download</key>
  <key>generate_document</key>
</keys>
filetransfer specific value option filetransfer_object_types_search.xml
L-V-FILETRANSFER_OBJECT_TYPES_SEARCH-DOWNLOAD_LINK=Download package
L-V-FILETRANSFER_OBJECT_TYPES_SEARCH-DOWNLOAD_LINK-INFO=Download package
L-V-FILETRANSFER_OBJECT_TYPES_SEARCH-ETICKET=eTicket
L-V-FILETRANSFER_OBJECT_TYPES_SEARCH-ETICKET-INFO=eTicket
L-V-FILETRANSFER_OBJECT_TYPES_SEARCH-CART_HISTORICAL=Download
L-V-FILETRANSFER_OBJECT_TYPES_SEARCH-CART_HISTORICAL-INFO=Download
L-V-FILETRANSFER_OBJECT_TYPES_SEARCH-DOWNLOAD=Quick download
L-V-FILETRANSFER_OBJECT_TYPES_SEARCH-DOWNLOAD-INFO=Quick download
L-V-FILETRANSFER_OBJECT_TYPES_SEARCH-UPLOAD_HISTORICAL=Upload
L-V-FILETRANSFER_OBJECT_TYPES_SEARCH-UPLOAD_HISTORICAL-INFO=Upload
L-V-FILETRANSFER_OBJECT_TYPES_SEARCH-GENERATE_DOCUMENT=PDF overview
L-V-FILETRANSFER_OBJECT_TYPES_SEARCH-GENERATE_DOCUMENT-INFO=PDF overview
eticket_editor.properties with the corresponding label and tooltip (-INFO) translations
![]()
implementation in the GUI
Just make sure to assemble the translations of related value options in the same .properties files.
For more translation options and further details on label translations, check our label documentation.
# Implement Value Options
To display value options in the GUI, you must implement them in an object renderer's field renderer section. Use the XML's name for implementing: value option color_marking.xml is implemented as <name>color_marking</name>.
You have multiple attributes to choose from when it comes to define the design of your value options, e.g. if a pop-up should open, or if option "Select all" should display:
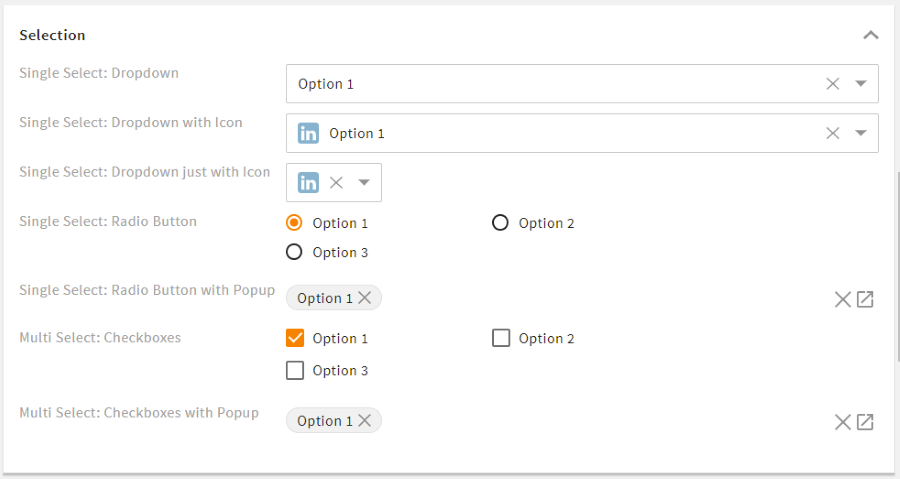
different ways to display value options
Value options can be implemented in:
- field renderers of type Selection
- field renderers of type Text, with
auto_complete/typeahead to make value keys available e.g. as a keyword list
<field_renderer exclude="!getFeature('file.show_color_tagging')">
    <label>L-FILE-SEARCH-COLOR_MARKING</label>
    <info>L-FILE-SEARCH-COLOR_MARKING-INFO</info>
    <type>SELECTION</type>
    <value_option_key>color_marking</value_option_key>
    <field_renderer_attributes>
        <entry class="boolean" key="has_popup">false</entry>
        <entry class="string" key="visual_type">checkbox</entry>
        <entry class="boolean" key="show_label">true</entry>
        <entry class="boolean" key="show_icon">true</entry>
    </field_renderer_attributes>
    <comparator>IN</comparator>
    <operator>AND</operator>
    <search_fields>
        <search_field>
            <name>color_marking</name>
        </search_field>
    </search_fields>
</field_renderer>
field renderer using value option "color_marking" with checkboxes, labels, and icons
result in the GUI
For all details on object renderers and possible field renderer attributes, compare our object renderer documentation.
# Reserved Generic Value Options
The following reserved value options are generated automatically and should not be overwritten. They are and can be implemented throughout the system:
themes: All registered themeslanguage: All registered languagesce_all_modules: All modules in alphabetical orderce_role_config_modules: All modules in alphabetical order for whichshow_in_role_configis set to "true"share_field_options: The option list of permissions a share session has per field